Conveyor can deploy and update desktop apps without needing app stores or special update servers. Many of our users like to use AWS S3 to serve their files, but configuring S3 can be complicated. The goal of this guide is to provide simple, step-by-step instructions to set up a state-of-the-art static website using Amazon AWS that:
- Uses HTTPS.
- Is safe and fast.
- Sends correct result codes, which S3 out of the box may not do.
- Doesn’t list the contents of your site.
- Can be easily customized for advanced behavior like cache control or custom error pages.
The result doesn’t have to be used for serving Conveyor generated files. This guide should be useful for anyone using S3.
The way to set up a website like that is available in the AWS knowledge center, though it can be hard to decide which is the most appropriate solution for you. This guide will help you quickly set up a production-grade static website that can be published immediately, so you can skip the lengthy process of studying AWS documentation.
Part 1: Storage in S3
S3 is a scalable file store that holds data in globally named “buckets”.
Create AWS account: If you don’t have an AWS account yet, go to AWS and click the big Create an AWS Account button. Follow the instructions until the account is created.
Create an S3 bucket: Navigate to the S3 console and click the Create bucket button:
- Bucket name: Pick whatever you want. Something with the name of your app in it would be a good choice.
- AWS region: There will be a default region near you, which is good enough to start with.
Leave everything else in the default state, particularly the option to Block all public access. We’ll enable public access later when ready to serve.
Enable static hosting: on the bucket’s page, select the Properties tab, scroll all the way down and enable the Static website hosting option. Just select Enable and set a value for the Index document (for instance,
index.html). Don’t touch any of the other options for now.
This sets up your bucket.
Part 2: Configure uploads in Conveyor
To configure Conveyor to upload your files for you, you can just add some more keys to your conveyor.conf file:
app {
  site {
    // We'll change this in the next step.
    base-url = "https://my-bucket.s3.amazonaws.com/path/to/site"

    copy-to = "s3:my-bucket/path/to/site"

    s3 {
      region = "us-east-1"
      access-key-id = ${env.AWS_ACCESS_KEY_ID}
      secret-access-key = ${env.AWS_SECRET_ACCESS_KEY}
    }
  }
}
Change us-east-1 to the region you selected in part one. Now create an access key and place the results into the two
environment variables AWS_ACCESS_KEY_ID and AWS_SECRET_ACCESS_KEY. Alternatively you can just put them directly
into your config file by replacing ${env.AWS_ACCESS_KEY_ID} and ${env.AWS_SECRET_ACCESS_KEY}.
If you want to upload files yourself without using Conveyor, you can do it via the S3 web UI or by using the aws
command line tool.
Although you can now run conveyor make copied-site to do a release directly to S3, don’t upload any files yet.
Part 3: Serving in CloudFront
You could serve your downloads directly from S3 but that won’t support SSL/TLS, only serves from the selected region and doesn’t provide other options like caching.
Instead, we’re going to be using CloudFront for serving the site. CloudFront provides several advanced controls, plus a proper CDN, so it can be incredibly fast.
Create a large random string. For instance, you can use the
uuidgencommand or go over to the Online UUID Generator and just copy over the UUID from there. This string will be referred to as$TOKENin the remainder of this guide. Keep it safe! The$TOKENwill be used to ensure that only AWS CloudFront will have access to your S3 bucket. For additional security, it can be rotated eventually.Create a CloudFront distribution. Navigate to the CloudFront console, press the Create distribution button and fill the form out:
- Origin:
- Origin domain: choose the S3 bucket created above. You will be prompted to use the S3 website endpoint instead of the bucket endpoint, click the Use website endpoint button. Notice that the only protocol you’ll be able to choose is “HTTP only”. That is, in fact, correct: that’s the protocol CloudFront will use to connect to the S3 bucket, not the one used by customers to connect to CloudFront.
- Add custom header: click Add header, set the Header name to
Refererand the Value to the token you generated above.
- Default cache behavior:
- Viewer: select Redirect HTTP to HTTPS.
- Web Application Firewall (WAF): You’ll need to keep this turned off because the update engines used by deployed apps aren’t web browsers and the files being served aren’t a web app.
- Settings: You don’t need to change any of those for now. If you like, eventually, you can set an Alternate domain name (CNAME) so you point your users to a server with a nicer looking name than “<hash>.cloudfront.net”.
You can leave everything else to its default setting. Just click Create distribution, and it will automatically roll the first deployment.
- Origin:
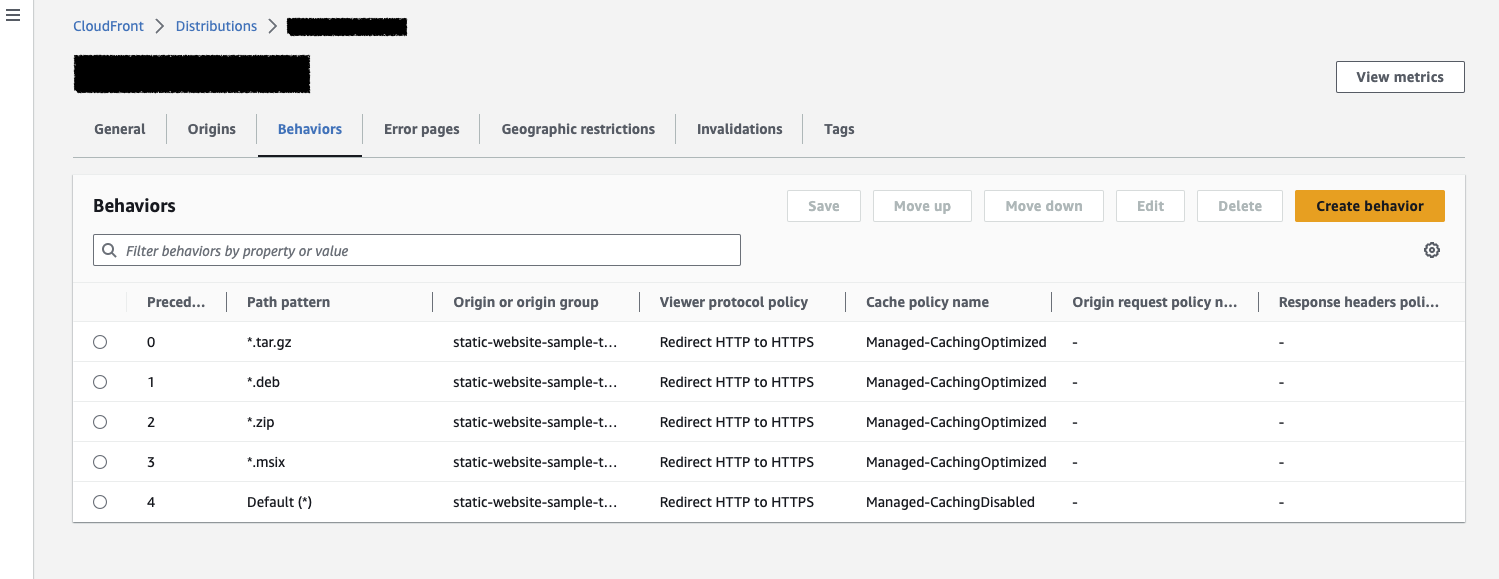
This creates the basic CloudFront distribution, but the files need different caching behaviours. “Volatile” files that can change need to be opted out of caching whilst stable files (like packages) can be cached at the edge permanently.
To configure the AWS cache behavior:
- Go to the distribution homepage, select the Behaviors tab
- For each pattern that needs to be cacheable (
*.tar.gz,*.msix,*.deb,*.zip):- Click Create behavior
- Add the Path pattern
- Select the Origin and origin groups (there should be only one, your S3 static website bucket)
- In Viewer protocol policy select Redirect HTTP to HTTPS
- In Cache policy select CachingOptimized
- Click Create behavior
- Select the Default behavior, click Edit, and then in Cache policy select CachingDisabled.
This will make sure that updates take effect immediately whilst still caching the big files that matter. The result should look like this:
That’s done but the files still aren’t publicly visible. Let’s fix that.
Part 4: Allow CloudFront to access your S3 bucket
Go back to the S3 console, select your bucket, select the Permissions tab.
Enable public access: under Block public access (bucket settings), click Edit, and uncheck the Block all public access box. Don’t worry, the contents are still not accessible as long as there’s no bucket policy set.
Set the bucket policy to:
{
    "Version": "2012-10-17",
    "Statement": [
        {
            "Sid": "AllowCloudFront",
            "Effect": "Allow",
            "Principal": "*",
            "Action": [
                "s3:GetObject",
                "s3:ListBucket"
            ],
            "Resource": [
                "arn:aws:s3:::$BUCKET",
                "arn:aws:s3:::$BUCKET/*"
            ],
            "Condition": {
                "StringEquals": {
                    "aws:Referer": "$TOKEN"
                }
            }
        }
    ]
}
Where
$BUCKETis the name of your bucket, and$TOKENis the large string you set up above. This policy allows CloudFront to serve your website without granting public direct access to your S3 bucket.
The contents of your website won’t be leaked if the user navigates to the root document or any other directory within the site; the s3:ListBucket permission is there only so missing pages return a 404 instead of a 403.
Part 5: Make your apps check CloudFront for updates
Now go back to your conveyor.conf and change your app.site.base-url key to point to the CloudFront domain that was
just set up. If you’re setting up a custom domain of course, just use that.
With the site base URL fixed, you can now run conveyor make copied-site to do your release.
And that’s a wrap!
You now have a scalable, safe and fast download site for your users!